You have to complete the following process in order to configure, run and analyze the results after you create database test plan using MySQL database.
- Install MySQL database
- Start MySQL database server
- Create a
database - Download and setup the MySQL connector
- Create a JMeter test plan
- Add and configure JDBC connection configuration
- Create a JDBC sampler
- Add listeners
- Run the test plan
Let’s go in detail about the steps mentioned above.
Table of Contents
Install MySQL and Create a Database
In order to create database test plan in JMeter using MySQL, you have to install and set
For installing MySQL database server in your computer, you can download the software from MySQL official website and set up on your computer. You may also download and install XAMPP software for quick and easy installation of MySQL. It also included with Apache server, Filezilla, Tomcat,
After successfully installing MySQL on your computer using any of the method, you have to create the database and tables. You may use the following SQL queries as an example or can do manually using GUI methods.
CREATE DATABASE test;
USE test;
CREATE TABLE student_table (SN INT, Name VARCHAR(20), Address VARCHAR(20), Roll_No INT);
INSERT INTO student_table (SN, Name, Address, Roll_NO) VALUES(1,"Ram","Pokhara", 22);
INSERT INTO student_table (SN, Name, Address, Roll_NO) VALUES(2,"shyam","Pokhara", 23);
INSERT INTO student_table (SN, Name, Address, Roll_NO) VALUES(3,"Hari","Kathmandu", 24);
INSERT INTO student_table (SN, Name, Address, Roll_NO) VALUES(4,"Sita","Kathmandu", 25);
Following is the database table created with the SQL queries written above along with the data at the table.

Download and Setup MySQL Connector
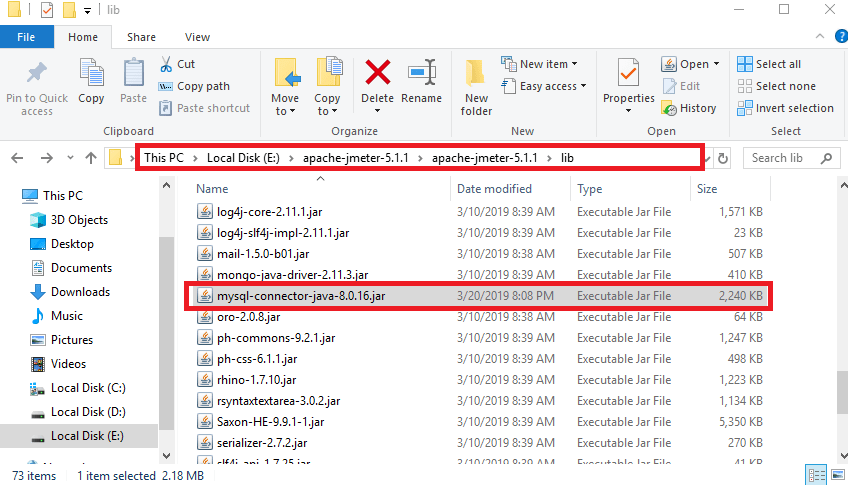
The MySQL connector should be set up on the JMeter folder before starting to create a database test plan. You may search and download the platform independent JAR file or MySQL connector or you can directly go to this page to download it. After downloading the file copy it in the lib folder of JMeter folder as shown on the screenshot below.

Create Database Test Plan
You can create the JMeter test plan doing t
- Right click on Thread Group.
- Go to “Add” and then Config Element.
- Click on JDBC connection configuration.
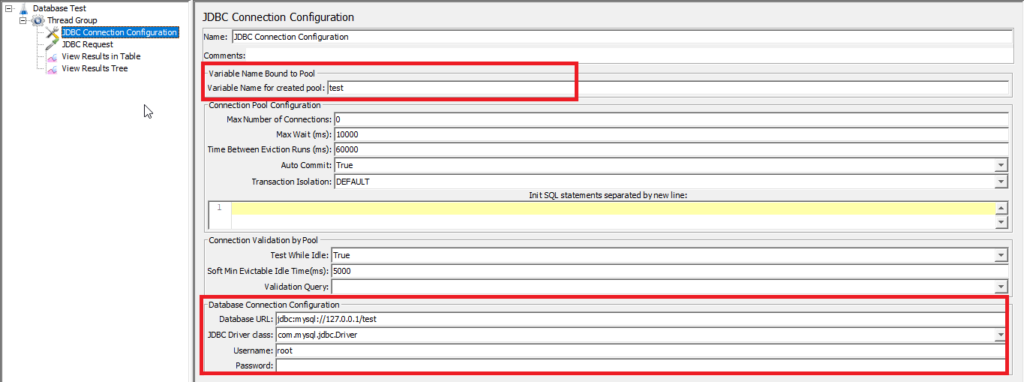
- Enter a variable name on the “variable name for created pool” field. For example, we have set the variable name “test” on the created pool field which is shown on the screenshot below.
- Type the URL of the database on Database URL field preceding with “
jdbc :mysql :”. In the screenshot below we have written “jdbc :mysql ://127.0.0.1/test” since the MySQL was installed on the local computer and the name of the database was “test”. - Select the option “com.mysql.JDBC.Driver” on JDBC driver class field.
- Provide the user name and password of the database server. In the screenshot below, we have written “root” as the username of the database and left blank password field, since there is no password for this username.

Now, use the following steps in order to add JDBC sampler within the recently created JMeter thread group.
- Right click on Thread Group.
- Go to “Add” and go to “sampler”.
- Click on JDBC request.
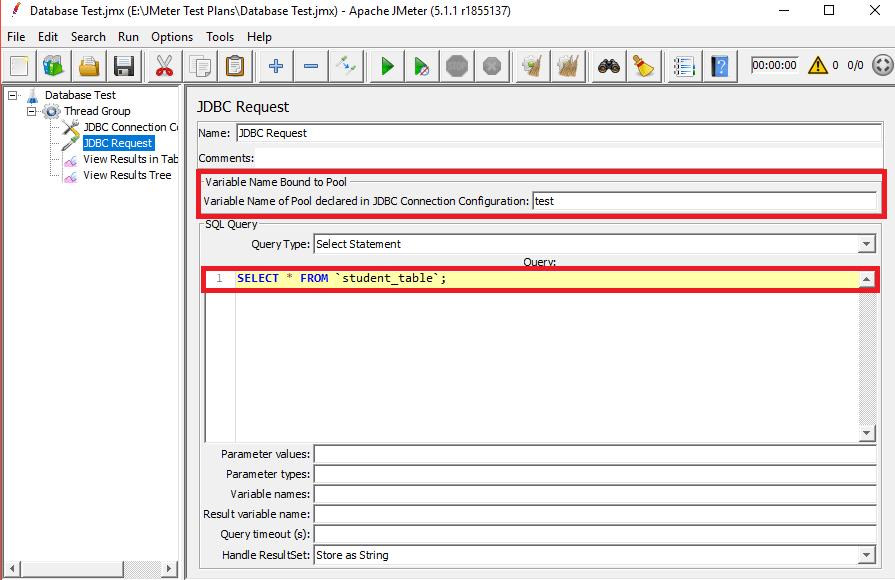
- Write the variable name of the
pool declared in JDBC connection configuration. - Select the query type “Select Statement” if you want to run the select query, “Update Statement” if you want to insert or delete the data from the table.
- Type the query which you want to run to the database table. For example, if you want to retrieve all the data from student_table you may write the query
“ SELECT * FROM student_table;“ as shown on the screenshot below.

Execute the Database Test Plan
You can execute the database test plan after adding JDBC connection configuration and JDBC samplers. Before executing it, you have to add listeners in order to view the test result. For easier to use, you may add view results tree and view results in table listeners. To know more about the common types of listeners that can be used on JMeter, refer to the previous article “How to Use the Most Common Types of JMeter Listeners“.
Now, run the JMeter test plan and view the test results through the listeners you have just added.


