Table of Contents
Setup Your Device
Before starting to record device log, you have to prepare your device to allow an ADB connection for collecting logs. For that, you have to enable USB debugging on your device. Use the following steps to enable USB debugging for Android 4.2 and higher, if you have not done already.
- Open the setting.
- Select developer options.
- If did not see developer options,
- Go to About phone or tablet
- Scroll to Build number and tap on it several times.
- On the developer options, scroll down to USB debugging and enable it.

Install Minimal ADB and Fastboot Tool
In order to install Minimal ADB and Fastboot tool on Windows, follow the steps given below.
- Download the installation file of Minimal ADB and Fastboot tool from here.
- Run the .exe file after the download completes.
- Click on Next button as on the image below, when the application set up wizard welcome screen appears.

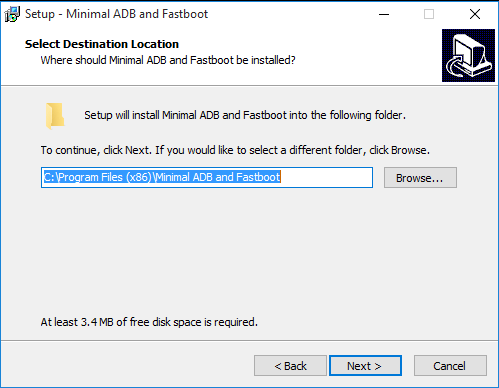
- Complete the steps and select your installation destination location if required otherwise left the default location.

- Select the location for application shortcut file or leave the default location.

- After all the installation setting completes, click on the install button to start the installation.

Test The Installation
When the installation completed, you can open the application via short icon created while installing. When the command window of Minimal ADB and Fastboot Tool opened, use these commands to check whether the application installed successfully or not.
adb versionThis command will display the version info of ADB.
adb devicesThis command will show the list of devices connected with the USB debugging option enabled. All the devices should be listed here, if not you should disconnect the ADB device and connect it again.
Recommended: How to Get Browser Console Logs While Testing Website
Start to Capture Android Logs
After successfully installing the tool, you can start to capture Android logs from any mobile application or mobile web. If you do not have enabled USB debugging on your phone or tablet, do it at first with referring to the instruction provided at the top of this post. Follow the steps given below if you want to capture Android logs from the mobile application or mobile web.
- Connect your phone or tablet to your computer using a USB cable.
- If you have connected this device for the first time, wait for driver installation to finish.
- Create or pick the destination folder for saving recorded log files. For example, you can create a folder named “logs” on D: drive.
- Copy the complete path of the file, for this right click on the address bar of file explorer and click on “copy address as text”. If you have created the folder on the location mentioned in step 3, the path will be “D:\logs”.
- Launch the Minimal ADB and Fastboot application from its shortcut.
- Enter the command like “adb logcat > D:\logs\log.txt” and press Enter key for starting to capture logs. You can paste the previously copied folder path after the command “adb logcat >”.
- Now recording the logs will be started to your specified file and you will see the blank command screen.
- After you have finished reproducing the bug, you can stop the log transmission with simply pressing the CTRL+C key from the keyboard or you can even disable USB debugging option from your device. Now you will find the file with the logs recorded.
Setup to Capture Android Logs Automatically
You can even setup the batch file for recording the android logs automatically. For that, you have to save some command lines on the batch file and have to run the file from the same location of executable ADB and fastboot files installed. Copy the code given below and paste into a new notepad file.
set timestamp=%date:~10,4%-%date:~7,2%-%date:~4,2%-%time:~0,2%-%time:~3,2%-%time:~6,2%
adb logcat -c
adb logcat>D:\logs\log-%timestamp%.txt
The command set timestamp will create the variable timestamp which will be used on a filename. The command “adb logcat -c” used on the second line will erase all the previous logs on your device. You can update the file path with your file path located on the last line.
Save the file with the extension .bat. Now, copy that file to “Minimal ADB and Fastboot” directory and create the shortcut of the file to the desktop. When clicking on the shortcut file, the command window will open and start to record the log. Press CTRL + C and press Y from the keyboard to stop the recording. The captured log will be saved on your provided location.
Read Next: How to Record Logs with Charles Proxy on Windows


