Table of Contents
Setting Up a New TestNG Project
If you have successfully installed TestNG plugin in Eclipse IDE as the instructions given on the previous article. Use the following steps in order to setup New testNG project in Eclipse.
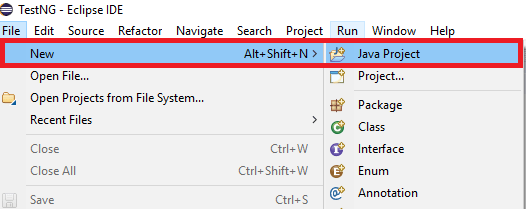
Step1: Go to file menu, click on “New” and then “Java Project” as given on the image below.
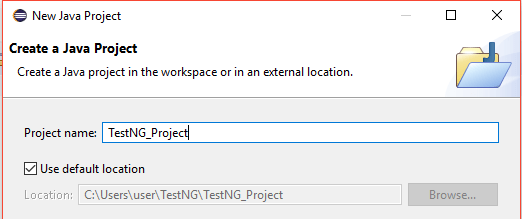
Step2: On the “Create a Java Project” window, enter the name of the project. Here we are giving “TestNG_Project” as the project name. Click on the next button to go to the
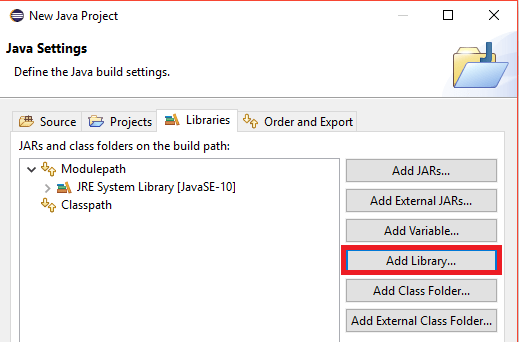
Step3: Now, we have to import the TestNG Libraries to our project. Go to “Libraries” tab and then click on “Add Library” button.
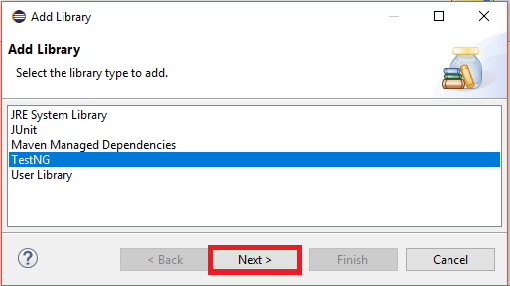
Step4: Choose “TestNG” from the available options on Add Library dialog box and click on the Next button.
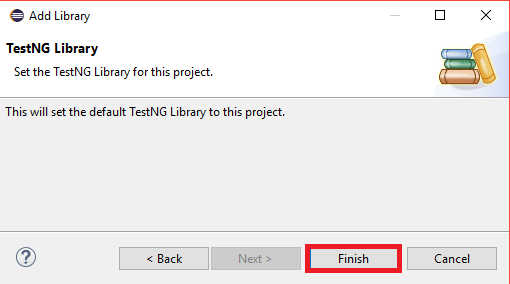
Step5: Click on Finish button, when the next dialog box appears. It will set the default TestNG library for this project.
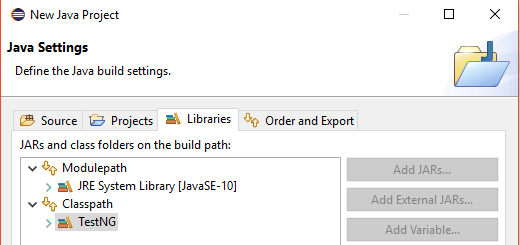
Step6: When you have completed all the above steps, you will notice TestNG is included on the Libraries list.
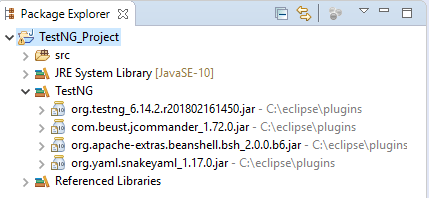
Step7: Now, you have to add external JAR files which contain the Selenium API. For the steps to add external JAR files, refer to the instructions given in the article “How to Get Started With Selenium WebDriver for Java“. I would recommend not to create the module if asked while finishing the process. When you have finished the steps, the “TestNG_Project” will be visible on the Eclipse’s package explorer.
Creating a New TestNG Class
When you have successfully completed setting up a new TestNG project, you have to create a new TestNG class before starting to write test scripts. Use the following steps to create a new TestNG class file.
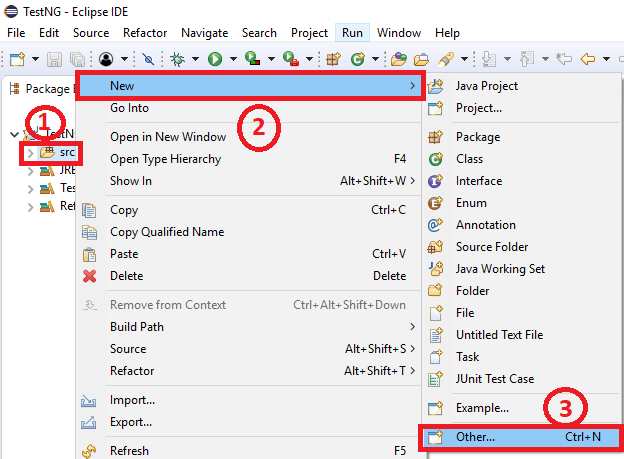
Step1: Go to Eclipse package explorer and right click on the “src” package folder. Click on “New” and then “Other” as given on the image below.
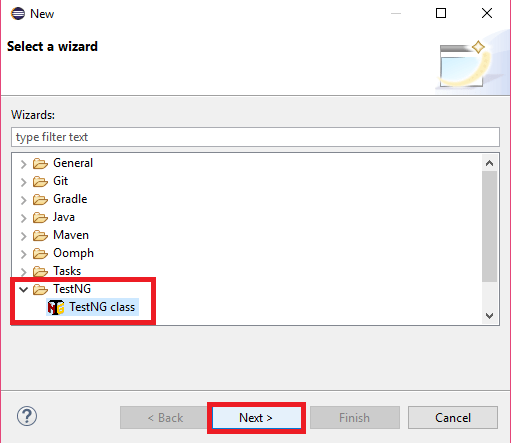
Step2: Expand the “TestNG” folder, then select the “TestNG class” option and click on Next button.
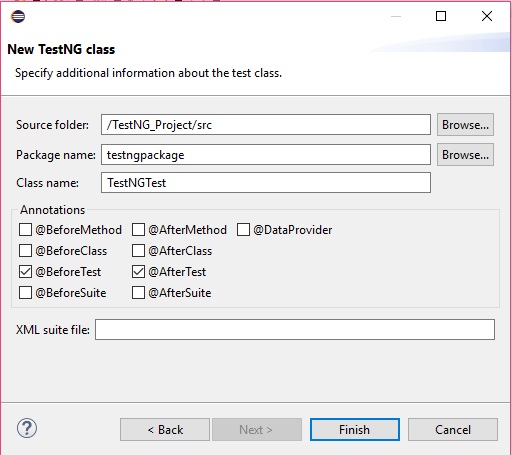
Step3: Browse and select the source folder clicking on the
Writing the First Test Case with TestNG
When you have completed creating the new TestNG project and the new TestNG class, you can write your first test case with TestNG. Following is the sample code for Firefox browser, that will check the homepage title of this blog and verifies with the expected title. Copy the following code to your class file created within the Eclipse IDE.
package testngpackage;
import org.testng.annotations.*;
import org.openqa.selenium.WebDriver;
import org.openqa.selenium.firefox.FirefoxDriver;
import org.testng.Assert;

public class TestNGTest {
public String testurl="https://siteforinfotech.com/";
String driverPath="E:\\geckodriver.exe";
public WebDriver driver;

@BeforeTest
public void beforeTest() {
System.out.println("Browser was opening now");
System.setProperty("webdriver.gecko.driver", driverPath);
driver= new FirefoxDriver();
driver.get(testurl);
  }
@Test
public void PrintTitle() {
String  Title=driver.getTitle();
System.out.println(Title);
  }
@Test
public void VerifyTitle() {
String ExpectedTitle="InfoTechSite | CS/IT Tutorials, MCQs, Guides And Reviews";
String ActualTitle=driver.getTitle();
Assert.assertEquals(ActualTitle, ExpectedTitle);
 }
@AfterTest
 public void afterTest() {
 driver.quit();
  }
}
In the above code, @BeforeTest, @Test, and @AfterTest are the annotations used in TestNG. The annotation @BeforeTest is used to tell that method under it is the action performed before starting the test case, it may include opening the test URL to the browser. The methods used under @Test is the test case and the methods such as closing the browser are used under @AfterTest. You should write the following line of code on the import block in order to use these annotations.
import org.testng.annotations.*;The method “Assert.assertEqual()” verifies the expected and actual values. This method was used to verify the expected and actual title of the webpage. You should write the following line of code on the import block in order to use assertion commands.
import.org.testng.Assert;Running the Test Case
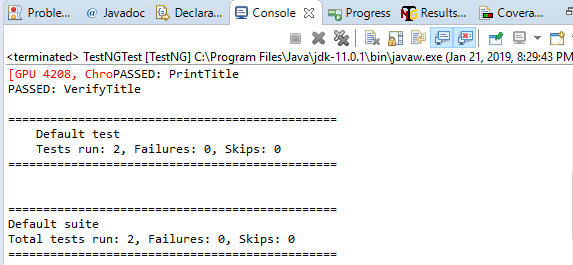
You may run the test case simply as other selenium test cases written on the previous articles. The Eclipse IDE will provide two types of results, one is within the console window and another is within the TestNG result window. The console window provides the text-based report whereas TestNG result window provides graphical reports. The test report will show the numbers on Passed, Failed and Skipped test cases as shown on the image below.
Generating HTML Report
TestNG also allows you to generate HTML reports. Use the following steps in order to generate reports in HTML format when you have finished running the test case.
Step1: Right click on the project name on the project explorer window and click on “Refresh” or directly press F5 key.
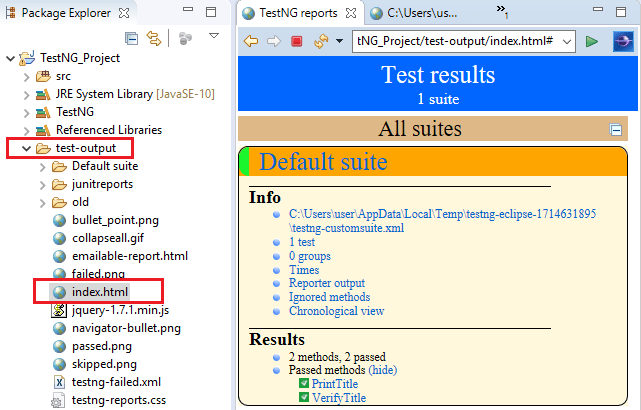
Step2: When you have noticed “test-output” folder, expand it to find out “index.html” file. Double click on the “index.html” file which will open on the Eclipse’s in-built web browser as given on the image below.


Comments are closed.